Containers are getting more and more popular over the last several years because of the benefits they bring for developing and deploying applications. A container is an isolated unit of software running on top of an operating system that packages up code and all dependencies of an application. That way the application can run quickly and reliably on different environments. Containers have the following benefits:
They allow for a consistent and rapid development environment
Setting up the development environment sometimes can take quite some time. It can be a boring activity for the developer. Having containers in place makes sure this task is fast, easy. Because it’s completely automated, the process is also more reliable.
It increases compatibility and maintainability
We’ve all heard the phrase “it works on my machine” when investigating a production incident. Having all application dependencies in the container itself makes sure no additional software is installed locally in order to run the application. This eliminates the issue of having different versions between development, test and production environments.
Continuous deployment and testing
Containers ensure that applications can run in consistent environments from development to production. All application configurations and dependencies are maintained within the container. This allows for the same container to be used for different deployment environments.
Simplicity and faster configurations
Containers simplify application setup and development. Users can grab the predefined image, make their own configuration and deploy it to a specific environment. The infrastructure requirements are no longer linked to the environment of the application.
Converting an Umbraco application
To offer insight into what effort goes into a container, I described the steps to convert an existing Umbraco application to a container one. Umbraco is an open source content management system, based on Microsoft Asp.Net. I wanted to investigate how the use of containers can speed up development environments setup, make the application consistent through environments and enable faster deployments.
For containerization I used Docker, which allows you to create images and containers running on both Linux and Windows operation systems. Docker containerized software/applications are always the same, regardless of the infrastructure.
For a development machine I had Windows Server 2016 installed and I used it as host machine for my Docker containers.
So, let’s start with the steps to convert existing Umbraco Asp.Net application to a Docker container:
1. Install Docker Compose for Windows Server 2016 – Docker Compose is a tool, which allows configuring and running multi-container Docker applications. They are described in a Compose file with YAML format (see step 4 below). There is an article provided by Docker, which guides you through the needed steps. It again uses Windows PowerShell.
2. Install Docker for Windows Server 2016 – Microsoft explained in this article how to install Docker engine. You will need to use Windows PowerShell for the installation
3. Create a custom Docker image for the website application. To create a Docker image, I needed to run the command docker build -t <YourImageName>. in PowerShell. Docker engine will create the image based on the configuration described in a docker file. Here is my Docker file content:
FROM microsoft/aspnet
ADD *.ps1 ./
COPY .\\helpers\\common.ps1 C:
RUN powershell.exe c:\Setup-IIS.ps1
EXPOSE 8080
RUN powershell New-Item -Path 'C:\Certificates' -ItemType Directory -Force | Out-Null
COPY .\\Certificates\\Install-Certificates.ps1 C:\\Certificates
COPY .\\Certificates\\Add-User-To-Certificate.ps1 C:\\Certificates
COPY .\\Certificates\\Set-IIS-Folder-Permission.ps1 C:\\Certificates
COPY .\\Certificates C:\\Certificates
RUN Certificates\Set-IIS-Folder-Permission.ps1
RUN Certificates\Install-Certificates.ps1
# Install remote debugging tools
EXPOSE 4020 4021
RUN Invoke-WebRequest -OutFile c:\vs_remotetools.exe -Uri https://download.visualstudio.microsoft.com/download/pr/4d62ca5e-0b80-4dd5-9e46-1cc71e590f3f/6b0fee6233ef3a1b679f2a0b12b0520e/vs_remotetools.exe;
RUN & 'c:\vs_remotetools.exe' /install /quiet
What it does is first to set an instruction that our image will be based on the Microsoft Asp.Net image, which allows running Asp.Net MVC, Web API and SignalR applications. It is built on Windows Server Core OS and has IIS 10 installed, together with multiple versions of the .Net Framework. It is published in the Docker Hub registry and publicly available.
A second step is to copy and run some PowerShell scripts into our image to setup additional features of IIS. Setup-IIS.ps1 does the following actions:
- downloads and install UrlRewrite,
- creates the IIS application that will host our site (including the bindings, port 8080, application pools and physical path pointing to C drive of the image -> C:\mysites\myumbracoproject),
- adds virtual directories in the created IIS application used to for Umbraco content sync tool and application content files (Razor view, CSS, JS files, images)
Then I instruct the image to listen on port 8080.
In the next several lines, I copy certificates and scripts to the image and run the scripts to install all elements needed by our application certificates and permissions.
The last three instructions are to expose ports 4020/4021, needed for remote debugging, and to download and install Visual Studio 2017 remote debugging tools. I will need those to enable remote debugging via Visual Studio (see step 5 below).
Once docker build command is completed, I will have a Docker image created on my host machine. At this point I can check the current images with docker images command, which will return two images: the one I’ve created and the one that comes from Microsoft (used as base of our image).
4. Run the Docker container.
To run the container, I used Docker compose command docker-compose up -d, which will run containers described in a YAML compose file. There I have two containers described: one for our application and one for the database it uses (UmbracoDB). Here is a snippet of my compose file:
version: "3.2"
services:
myumbracoprojectsql:
container_name: myumbracoprojectsqlexpress2017
hostname: sqlexpress2017
image: microsoft/mssql-server-windows-express:2017-latest
ports:
- "1433:1433"
networks:
- webnet
environment:
ACCEPT_EULA: "Y"
attach_dbs: "[{'dbName':'myUmbraco_DB','dbFiles':['C:\\\\data\\\\myUmbraco_DB.mdf','C:\\\\data\\\\myUmbraco_DB_log.ldf']}]"
sa_password: "<your_password>"
volumes:
- C:\Projects\Published\myprojectumbracodb:C:\data
myumbracoprojectsite:
container_name: myumbracoprojectcontainer
hostname: dev.myumbracoproject.local
image: myumbracoprojectimage
ports:
- "8080:8080"
- "4020:4020"
- "4021:4021"
networks:
- webnet
volumes:
- C:\Projects\Published\myumbracoproject\myumbracoprojectvolume:C:\mysites\myumbracoproject
- C:\Projects\MyUmbracoProject\Src\MyUmbracoProject.WebSite\Content:C:\mysites\Content
- C:\Projects\MyUmbracoProject\Src\MyUmbracoProject.WebSite\uSync:C:\mysites\uSync
networks:
webnet:
Important here is the definition of two services I am using: myumbracoprojectsql and myumbracoprojectsite.
The first one describes the container, which I use for SQL database, needed for Umbraco. It will create a Docker container named myumbracoprojectsqlexpress2017, based on Microsoft MSSQL Express database image. It is prepared by Microsoft and available in Docker Hub registry. Here I am attaching the database files of a previously backup of my UmbracoDB and creating a volume mapping between the host machine and the container itself.
A volume is a mechanism of persisting data generated and used by the Docker container, which is stored on the host machine. In this particular example all Umbraco data will be persisted physically on the host machine and will be safe when the container itself is stopped or deleted.
The SQL Server Express in the container is configured to store the database data in C:\data, while it is stored in folder C:\Projects\Published\myprojectumbracodb of the host operating system.
The second service in the Docker compose file describes the Asp.Net MVC Umbraco application. It will create a container called myumbracoprojectcontainer, which will be based on the previously created (in step 3) image myumbracoprojectimage. Again, I have defined volumes here needed for actual mapping between the Docker container and the host machine. The first volume ensures that the IIS application physical path C:\mysites\myumbracoproject will actually point to the C:\Projects\Published\myumbracoproject\myumbracoprojectvolume folder of the hosting machine. The remaining ones are for mappings used for MVC content files and Umbraco uSync files. We are using uSync tool for a persisting Umbraco content structure between different environments.
When running the docker-compose up -d command, Docker will create two containers based on the compose file above.
Now we have a running website (dev.myumbracoproject.local) and database in containers using mappings and persisting data on my host machine. Stopping or deleting the container will not cause me to lose any application or database files. I can check current running containers by using the command docker ps. It will show I have two active containers myumbracoprojectcontainer and myumbracoprojectsqlexpress2017.
5. Publishing
In previous step I created a volume for the container IIS application physical folder to map to a folder in the host machine. That is why I configured a publish profile in our Umbraco MVC application to publish files in C:\Projects\Published\myumbracoproject\myumbracoprojectvolume.Now, when I hit publish, website application files are copied there, and the IIS webserver renders them. In step 3, I installed Visual Studio remote debugging tools in the container and now I can attach it to a process and debug my Umbraco application.
What is next?
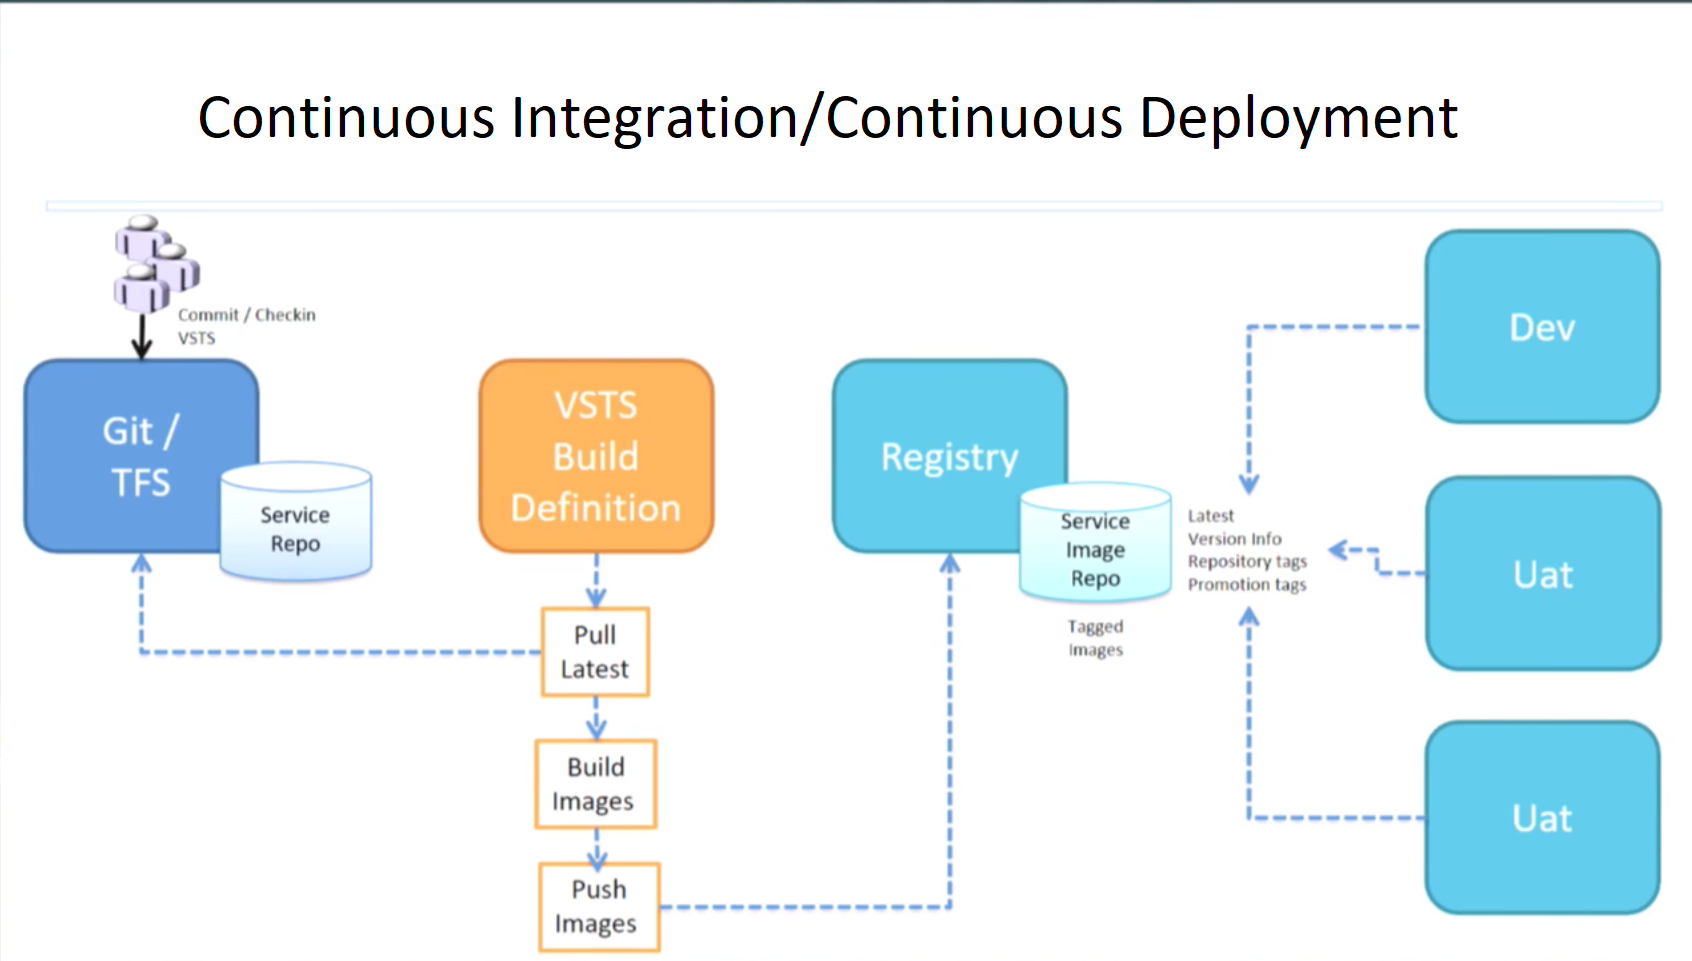
I now have our Umbraco Asp.Net application running in containers and setting up a development machine for a new developer in the team will be a lot easier than before. This however does not fully deliver all the benefits containers can bring. My next step would be to setup a process for continuous integration and deployment using containers. We will need to create our own company Docker registry to be able to push new images with tags (versions) and deploy them to target environments.
This process is visualized in the following diagram:
Containers can offer valuable benefits in a relatively short time. Please reach out if you want to know more about using docker containers for Umbraco or if you have any questions.

Written on: April 22, 2019
Written by Ivan Nikolov